Here is the rewritten text, meticulously engineered from the perspective of a Skincare Scientist.
*
**A Protocol for the Terminal Sanitation of Cosmetic Applicators**
To believe that conventional cleansing is adequate is a fundamental miscalculation. Such methods merely address superficial soiling—the cosmetic stain—while ignoring the teeming colonies of sub-visible contaminants. For genuine aseptic conditions, a clinically precise protocol is required. Your cosmetic applicator should not be regarded as a benign implement but as a proliferative bioreactor. Its porous, hydrophilic polymer matrix constitutes an optimal cultivation chamber for microorganisms, which flourish upon a nutrient-rich substrate of cutaneous sebum, cosmetic pigments, and exfoliated keratinocytes. Our singular objective is to render this bioreactor entirely inert.
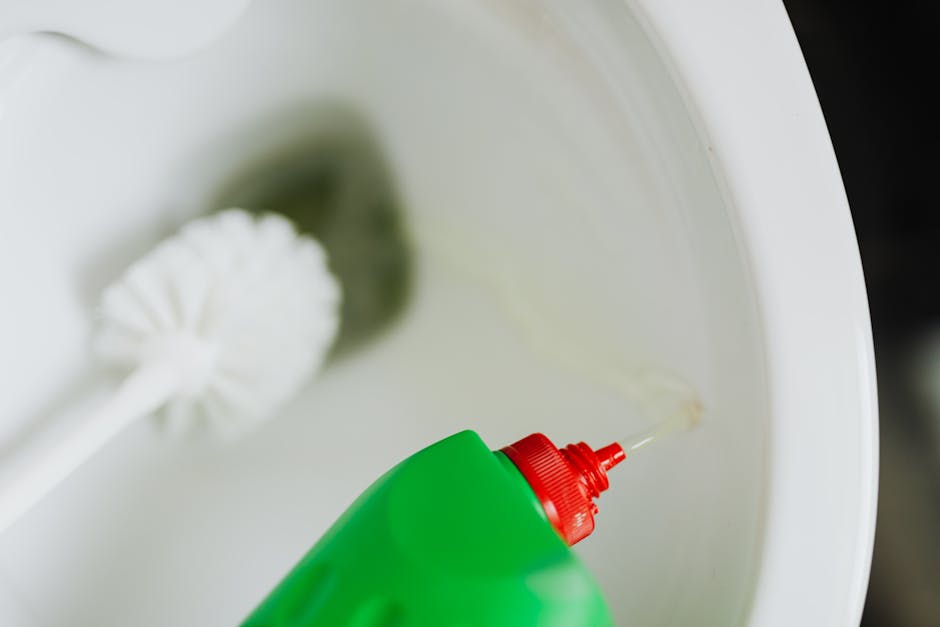
**Stage I: Lipophilic Matrix Disintegration (The Solvent Phase)**
Comprised primarily of lipids, the residual matrix of foundation, concealer, and cutaneous sebum presents a formidable challenge that aqueous solutions cannot overcome. Governed by the axiomatic principle of 'like dissolves like,' our initial assault targets these tenacious, oil-based compounds directly.
1. Solvent Selection: A pure, non-comedogenic carrier oil is the reagent of choice. We advocate for mineral oil due to its inert and non-oxidizing chemical profile, which prevents it from becoming a secondary contaminant. Avoid botanically derived oils prone to rancidity.
2. Anhydrous Application: This procedure must be initiated upon a completely desiccated applicator. Any moisture will create a hydrophobic barrier, repelling the oil and nullifying this critical stage. Dispense a liberal volume of the selected solvent onto the applicator's most heavily impregnated regions.
3. Mechanical Solvent Penetration: With gentle but persistent pressure, knead the solvent into the applicator’s core. The goal is not abrasion but a deep solubilization, using the oil to dislodge and liquefy the lipid-based agglomerations from within the polymer structure. A successful application is visually confirmed when the makeup appears to liquefy, and the pigment-lipid slurry achieves a state of low viscosity. This mechanical action should persist for a minimum of 60 seconds to ensure complete saturation.
Underlying Principle: This stage is engineered to deconstruct the stubborn, oil-soluble compounds that serve as the cohesive substrate for the entire biofilm. Bypassing this step means any subsequent surfactant-based wash will only achieve surface-level cleaning, leaving the core of microbial contamination undisturbed.
**Stage II: Micellar Emulsification and Aqueous Purge (The Surfactant Phase)**
Having successfully disintegrated the oily framework, we can now deploy a surfactant to systematically capture and eliminate both the solvent and all water-soluble detritus.
1. The Cleansing Agent: A purpose-formulated tool cleanser or a mild, non-fragranced liquid soap is mandated. The optimal agent possesses a neutral pH, a critical parameter for preserving the structural integrity of the applicator's polyurethane foam. Aggressive dish soaps, formulated with potent degreasers, must be avoided as they will embrittle the polymer, leading to premature mechanical failure.
2. Micelle Formation: Apply the cleansing agent directly onto the oil-saturated applicator prior to introducing water. Methodically massage the surfactant into the matrix. This anhydrous step is crucial, allowing the surfactant’s amphiphilic molecules to orient themselves around the oil droplets, forming the microscopic structures known as micelles.
3. Thermo-Regulated Rinse: Initiate a continuous flow of water within a controlled thermal range (38-40°C / 100-105°F). This specific temperature optimizes the surfactant’s cleansing efficiency without thermally shocking or degrading the applicator’s material. Repeatedly compress and release the applicator under the stream. The effluent will initially present as a milky liquid—the physical evidence of the oil-in-water emulsion being purged. Continue this process until the effluent runs with complete clarity, the definitive endpoint of the decontamination purge.
4. Final Aqueous Expulsion: Terminate the water flow. Execute one last, forceful compression of the applicator to expel the maximum volume of residual water.
**Stage III: Terminal Desiccation and Biostatic Storage**
An incompletely desiccated applicator creates an environment ripe for immediate microbial recolonization. The final stage is therefore as critical as the first.
1. Initial Moisture Abstraction: Enfold the cleansed applicator within a clean, lint-free microfiber textile. Gently roll and compress it to wick away any remaining surface water.
2. Unimpeded Aeration: Position the applicator on a specialized, ventilated holder or an elevated, clean surface. Unobstructed atmospheric exposure from all vectors is paramount for complete drying. Under no circumstances should a damp or even partially moist applicator be sequestered within a closed container or cosmetic bag.
3. Final State Confirmation: A successfully sanitized and fully desiccated applicator is confirmed by a tactile and gravimetric assessment. It will feel uniformly soft and remarkably lightweight, with no dense, hardened, or damp loci. It has now been restored to a state of microbial neutrality and is certified for epidermal interface.
As a skincare scientist, I must present a rigorous, evidence-based analysis. The following is a deconstruction of the microbial risks and material degradation inherent in improperly maintained cosmetic applicators.
*
The Biofilm Breach: An Inquiry into Applicator Contamination
Consider your cosmetic sponge less a tool and more a clandestine bioweapon targeting your skin. Its seemingly immaculate exterior after a cursory rinse is a profound deception. Deep within its porous labyrinth, a complex, thriving microbial community has infiltrated the interstitial spaces, proliferating unchecked. This is the precise origin point for significant dermal insult. Each time you press this contaminated applicator to your face, you are executing a microbial siege, systematically bypassing your skin’s natural defense mechanisms to deposit a payload of inflammatory aggressors directly into the follicular and epidermal layers.
An Inventory of Microbial Antagonists
The warm, humid, and nutrient-dense environment of a used sponge presents an ideal incubation substrate for pathogenic colonies. In as little as one day, a flourishing micro-ecosystem can emerge, populated by:
- Cutibacterium acnes: As the chief instigator of acneiform lesions, this bacterium finds a direct route from the sponge to your pores. You are mechanically pressing a concentrated culture of this primary acne catalyst into your skin.
- Staphylococcus aureus: A formidable pathogen capable of inducing severe dermatological sequelae, including folliculitis and impetigo. Its introduction is especially perilous when the epidermal barrier is even slightly impaired.
- Fungal Proliferation (Mold & Mildew): The establishment of various fungal species introduces immunogenic mycotoxins. Direct contact with these compounds can provoke a cascade of inflammatory responses, from acute contact dermatitis to persistent, low-grade irritation.
Accelerated Polymer Matrix Failure
Beyond the biological threat, the accumulated bio-detritus initiates a rapid breakdown of the applicator itself. An ossified matrix—comprising desiccated cosmetics, sebum, and exfoliated keratinocytes—forms a rigid agglomerate within the sponge's flexible polymer structure. This leads to two critical modes of failure:
- Compromised Rebound & Elasticity: The sponge’s ability to compress and decompress, essential for a seamless application, is critically impeded by this internal calcification. The tool becomes rigid and unyielding, resulting in a blotchy, uneven deposition of product rather than the desired diffused finish.
- Catastrophic Structural Failure: Applying pressure to this hardened internal mass exerts immense stress on the delicate polymer latticework. This force induces microscopic fissures and fractures throughout the material, which not only destroys the tool’s utility but also creates new, irregular voids that offer enhanced sanctuary for microbial colonization. A rigorous decontamination protocol is therefore essential to preserve the sponge's designed viscoelastic properties.
Cross-Contamination and Efficacy Reduction
A saturated sponge, already at capacity with a slurry of oils and residual product, exhibits severely diminished absorbent properties. When introduced to fresh cosmetics, it can no longer effectively uptake the formula. This necessitates applying excessive quantities of your formulation to achieve even minimal coverage, leading to significant product waste. More alarmingly, this process inoculates your sterile cosmetic formulas with the sponge's resident microbes, compromising the entire product and accelerating its expiration. An aseptically maintained sponge, by contrast, ensures optimal product uptake, superior blending fidelity, and the chemical integrity of your entire cosmetics portfolio.